Knowledge Base

How to Configure an email S/MIME certificate with iOS
This document explains how to import, configure, and use your Personal Authentication Certificate / Email Certificate on an iOS device (such as an iPhone or iPad)
If you have already collected the certificate on your desktop or laptop, you first need to export it into a PFX/P12 format from the original browser used to collect it. When doing this, make sure you export the private key and include all certificates in the certificate path if possible. You must also specify a strong password to protect the certificate file.
Once exported, you can email the certificate file to your iOS device or transfer it in some other manner (for example, copy to a USB drive or upload then download from online storage).
Importing your certificate into iPhone/iPad:
-
Locate and open the .p12 file that contains the certificate you wish to import.
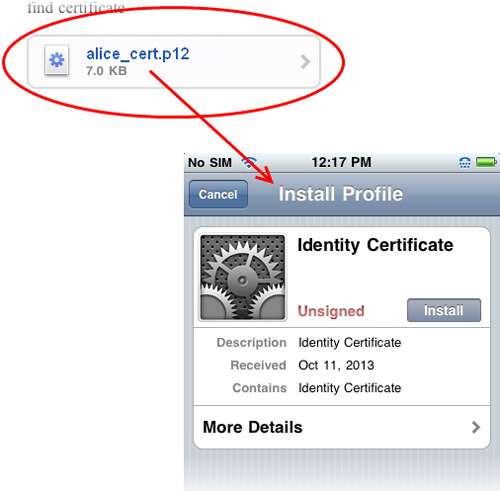
Tap the Install button to begin the certificate import wizard.
-
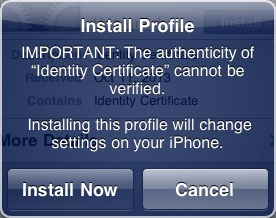
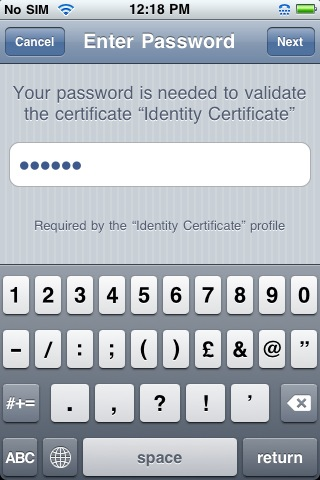
Select Install Now then enter the password you set up for the certificate when it was exported.
-
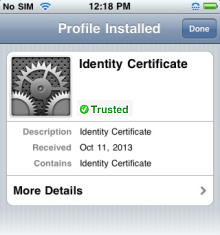
Once your password has been accepted, iOS will automatically import your certificate. You should see a confirmation dialog box, similar the one shown below.
-
Tap Done to exit the wizard.
This certificate can now be used to digitally sign and encrypt your emails and/or authenticate your identity. Next, you need to assign your certificate to your email account.
Enable S/MIME for your mail account:
-
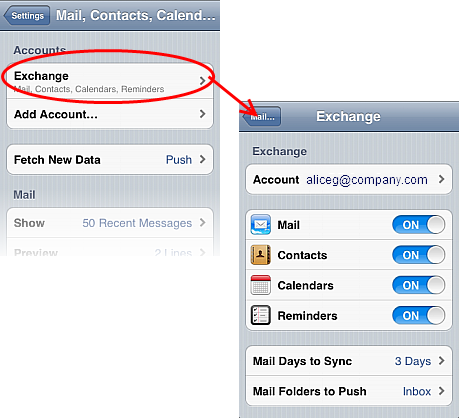
Open iOS Settings
 then open Mail, Contacts, Calendars
-
Open the mail account that matches your certificate and open its Advanced settings.
The location of the Advanced row may vary between versions of iOS.
-
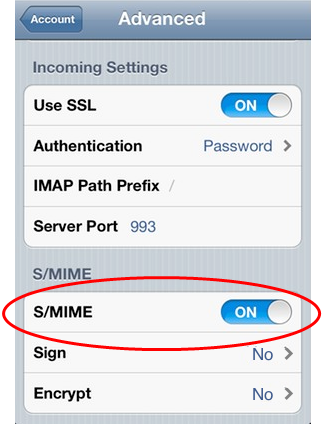
On the advanced settings page, scroll down to S/MIME and turn it ON. Doing so will reveal the Sign and Encrypt options:
Background information:
- Signing authenticates and attests to the integrity of your email by ensuring the recipient knows the email has come from you and by alerting them if the email has been modified since the time you sent it.
- Encryption ensures the privacy of your email by ensuring that only the recipient can decipher and view the email content. In order to encrypt email you must have the recipient's digital certificate installed on your device and their certificate must be assigned to the relevant entry in your address book
Enable signing and encryption:
Note - enabling the Sign/Encrypt options here will apply the action to all outbound emails from this account. Messages cannot be signed/encrypted on a per-message basis.
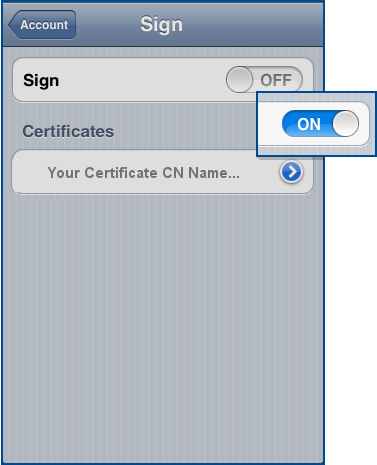
To digitally sign email:
-
Once S/MIME is activated, tap Sign.
-
Slide the Sign switch to ON.
-
Your certificate will likely already be selected with a check-mark next to it. If you have multiple certificates installed, choose the appropriate one.
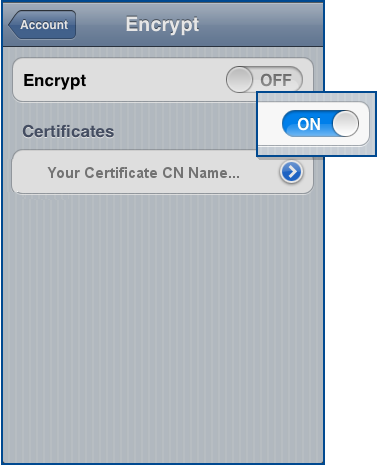
To encrypt email:
-
Once S/MIME is activated, tap Encrypt.
-
Slide the Encrypt switch to ON.
-
Your certificate will likely already be selected with a check-mark next to it. If you have multiple certificates installed, choose the appropriate one.
Note: If encryption is enabled, it is advisable to enable signing also so that new recipients can obtain your public key and send encrypted mails to you.